FamilyShield is a free service offered by OpenDNS and is distinct from their standard packages. Meant for home users who want to keep themselves and their families from seeing inappropriate images on their computers or wi-fi tablets, FamilyShield will always block domains categorized in their system as Tasteless, Proxy/Anonymizer, Sexuality, or Pornography. Unlike their standard Home service, you don’t need a registered network to use FamilyShield, and it’s just as easy to configure.
To use FamilyShield, you should set your DNS server entries: 208.67.222.123 and 208.67.220.123. On their website, you’ll may notice that OpenDNS’ DNS servers are 208.67.222.222 and 208.67.220.220, but these do not apply to FamilyShield users.
As an example, here are their generalized router configuration settings with the FamilyShield resolvers instead of their normal ones. If you have a specific router type, follow the instructions for that router but substitute 208.67.222.123 and 208.67.220.123 for the DNS server addresses.
1. Open the preferences for your router.
Often, the preferences are set in your web browser, via a URL with numbers (example: http://192.168.0.1 or http://192.168.1.1). You may need a password.
If you’re like us, and you set the router password long ago and cannot remember it now, you can often reset the password to the manufacturer default by pressing a button on the router itself.
Or preferences may be set via specific application for your router, which you installed on your computer when you added the router. The password should be set and known only by the least tempted adult.
2. Find the DNS server settings.
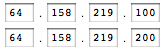
3. Put in the OpenDNS server addresses as your DNS server settings and save/apply.
Please write down your current settings before entering the OpenDNS addresses, just in case.
- 208.67.222.123
- 208.67.220.123